Installation
Installation is handled through bash or powershell installers to identify the operating system(Windows, CentOS, Redhat, Ubuntu, AIX, OSX, etc), download the agent software, register the agent, and finally set the default server/cluster IP address in the individual agent.
Each AO hub server acts as a software repository for all agent software. In addition it contains bash shell and powershell script installers.
Agent identity (endpoint UUID)
Supported agents maintain a persistent endpoint UUID in a single-line file under the agent installation tree (for example /var/ossec/etc/uuid on Linux, or under the agent etc directory on Windows). Do not edit this file manually.
The hub may use this identifier together with optional endpoint UID enrollment and identity modes on the manager. For administrator-facing settings and rollout considerations, see Identity and enrollment.

Linux: Push Installer
Push installations allow for remote installation of the Atomic OSSEC agent on a remote system using ansible over SSH. The push installer supports automatically configuring the agent group, and credentials stored in Amazon SMS.
Requirements
Atomic OSSEC 6.0.36+
SSH access to target host (TCP/22)
Root access to the target host (Password or SSH key)
Step 1: Log into the AO Hub and select Add Agent
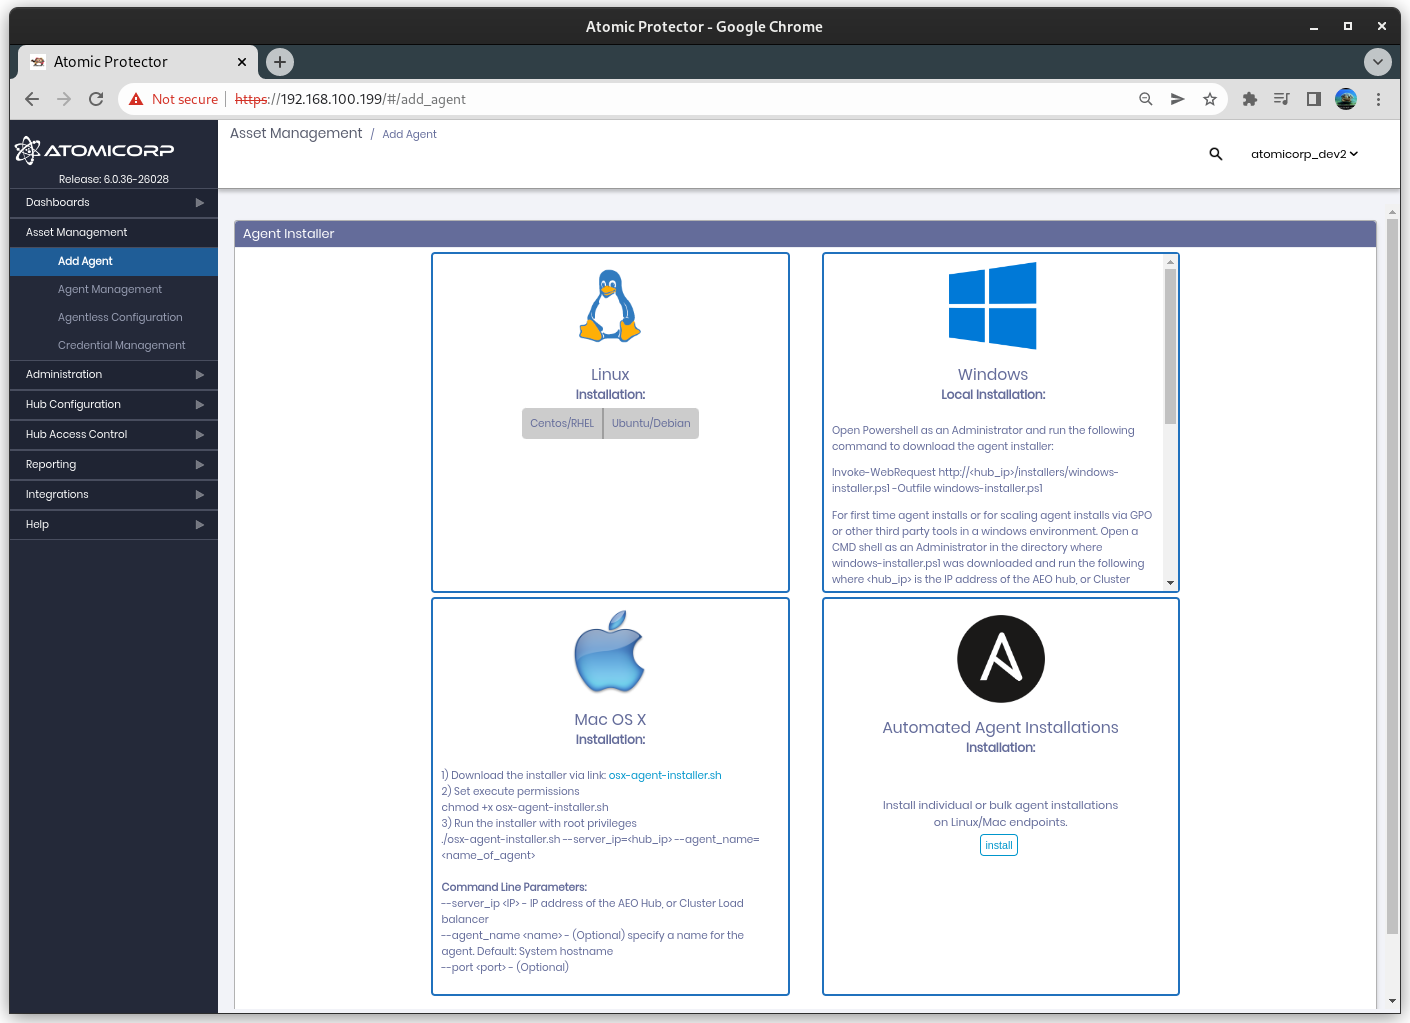
Step 2: Select Automated Agent Installations
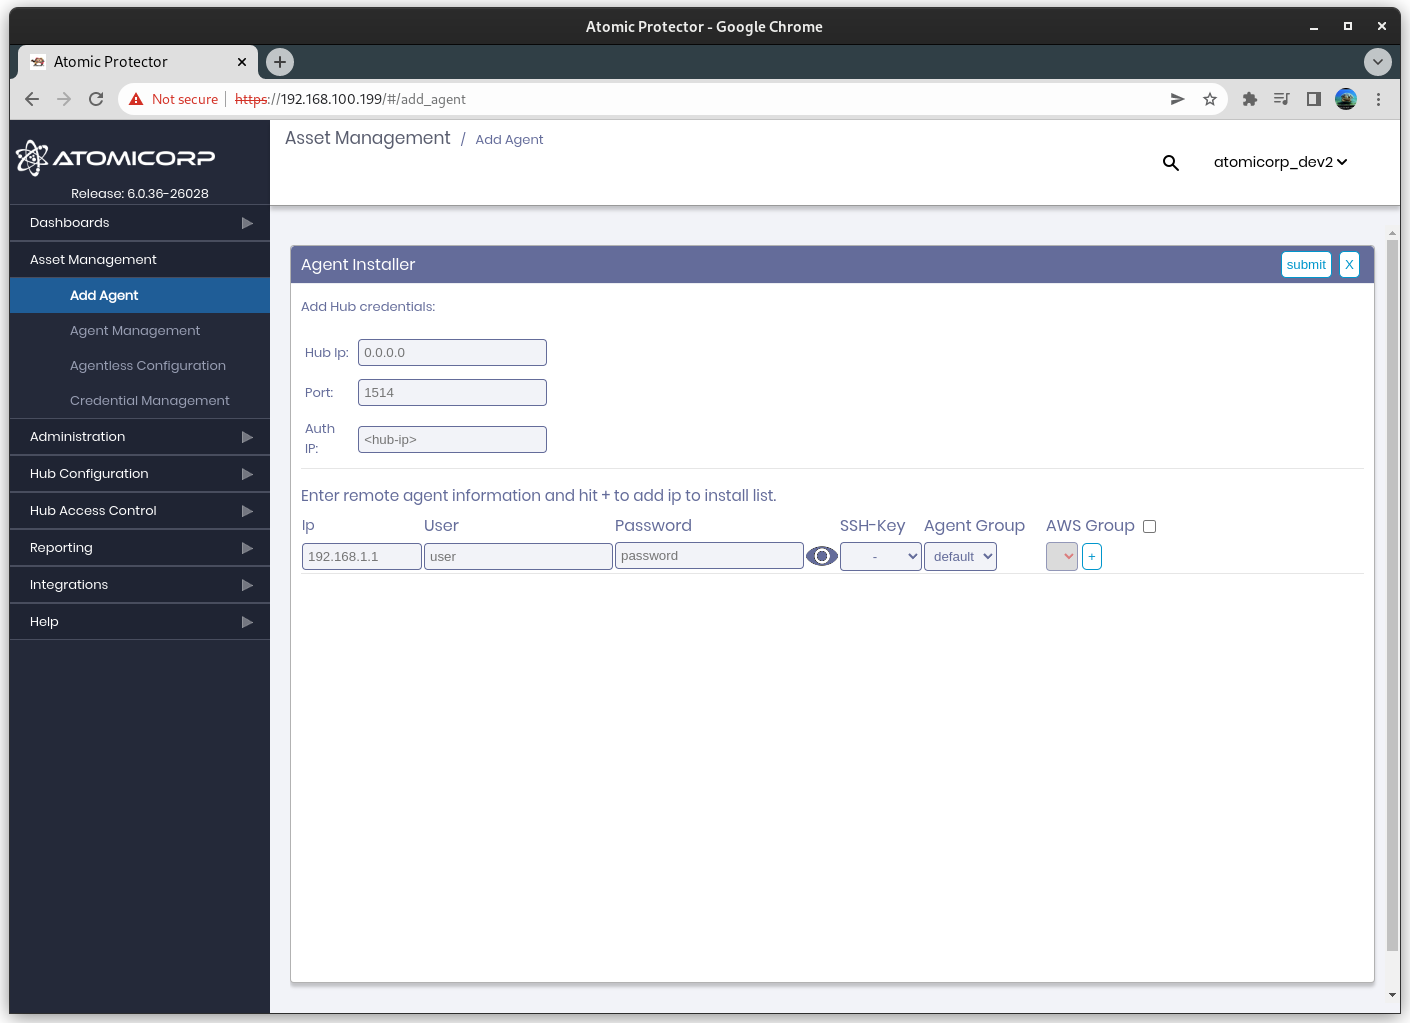
Step 3: Configure the Hub IP, Port and Auth IP
Hub IP: The external Hub IP address from the perspective of the agent.
Port: Port for the agent communications to use
Auth IP: The external IP address for the registration services from the perspective of the agent.
Step 4: Select the IP address, username, and authentication type for the agent
Note
SSH keys are configured from the Credential Manager.
Note
AWS Group can be selected to use username/password keys stored in Amazon SMS by using the amazon keyname in the username or password field. Example: my_amazon_username
Step 6: (Optional) Select the Agent Group
Step 7: Click + to add the system(s) to the list
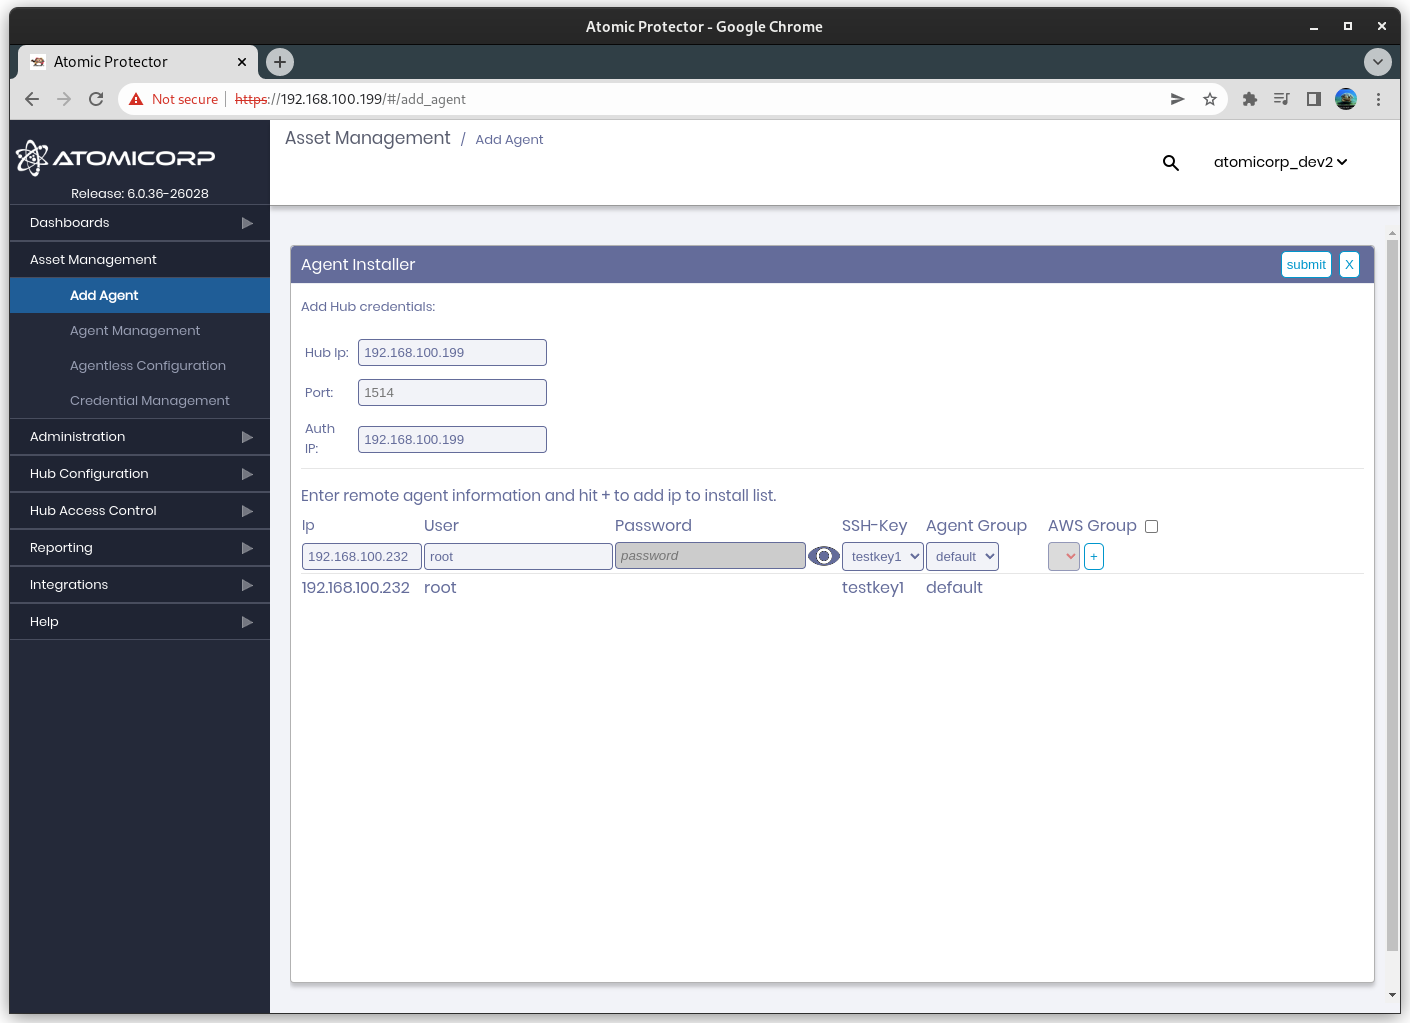
Step 8: Click submit to run the push installation on the target list
Linux: Local Installer
The linux shell script installer will install the agent on the system using a private Yum or Apt repo contained on the AO Hub server. It will then configure the agent (ossec.conf), and register the agent to the hub.
Requirements
Root or Sudo permissions
bash
Command Line Parameters
ossec-installer.sh –server <IP.ADDRESS.HUB>
example:
./ossec-installer.sh --server 10.11.12.13Command line parameters:
--server <server_ip>                    IP/Hostname of the server hub
--auth <auth_ip>                        IP/Hostname of the registration service. Used in complex clustering configurations where the registration IP differs from the Hub IP/Server
--password <password>                   Registration authentication password. D
--port <port>                           Port to communicate with the Hub server
--protocol <tcp|udp>                    Protocol for remoted

--agent-name <name>                     Set agent name [Default: hostname]
--enable-unattended-upgrades            Enable unattended upgrade support (Debian/Ubuntu only)
--default-name                          Prepend the external IP of the agent to agent name
--group  <groupname>                    Group to assign agent. [Default: default]
--https                                 Use https for installation. By default agents will add an apt/yum/dnf repo on HTTP. HTTPS installations require a valid SSL certificate on the hub server.
--install-only                          Only install the agent, do not register
--opencsw-repo <local|official>                 Use local opencsw mirror, or official repo (Solaris only)
--proxy <disable|url>                   Proxy settings. Proxy URL, or disable proxy for this installation
--use-aws                               Use the AWS instance ID for the agent name
--version                               Show Version
--https-enrollment                      Register agent over HTTPS (Agents v4.8 and higher)
Deprecated installation:
The following method is deprecated, and will be removed in a future update.
ossec-installer.sh <IP.ADDRESS.HUB> <IP.ADDRESS.AUTHD.SERVER> <PROTOCOL> <PORT>
example:
./ossec-installer.sh 10.11.12.13
<IP.ADDRESS.HUB> - (Required) IP address of the AO Hub Worker/Master, or Cluster Load balancer
<IP.ADDRESS.AUTHD.SERVER> - (Optional) IP address of the AO Hub Master, or Cluster Load balancer for agent registration
<PROTOCOL> - (Optional) tcp or udp
<PORT> - (Optional) port
optional environment variables
example:
export SERVER_IP=10.11.12.13 ./ossec-installer.sh
AUTH_IP - IP of server registration service.
GROUP - Group to assign agent
PASSWORD - Registration authentication password
PROTOCOL - Protocol tcp or udp
PORT - Port for remoted
SERVER_IP - IP of server hub
Step 1: Log into the system, and download the installer from the AO Hub
wget https://<IP.ADDRESS.HUB>/installers/ossec-installer.sh
Step 2: Change permissions of the installer
chmod +x ossec-installer.sh
Step 3: Execute the script with the IP address of the AO Hub server
sudo ./ossec-installer.sh --server <IP.ADDRESS.HUB>
Step 4: (Optional) Configure SELinux (RHEL/Centos)
If SELinux was enabled before the agent was installed, the RPM package will automatically add the SELinux agent policy. This can be confirmed with:
semodule -l |grep ossecIf SELinux was enabled after the agent was installed, the policy can be reapplied with:
yum reinstall ossec-hids-agent
Windows: Manual Installation with Powershell
The windows powershell script installer will install the agent on the system using a private HTTP/HTTPS repo contained on the AO Hub server, or a shared drive. It will then configure the agent (ossec.conf), and register the agent to the hub.
Requirements
Administrator rights
Powershell 5.1 or higher for HTTP/HTTPS installations
Command Line Parameters
agent_deployV2.ps1 -ossec_exec <path/url> -server_ip <IP>
-ossec_exec <path/url> - path or url to agent software
-server_ip <IP> - IP address of the AO Hub, or Cluster load balancer
-agent_name <name> - (optional) name to use for the agent. Default: windows hostname
-port <port> - (optional) Agent registration port. Default: 1515/TCP
-password <password> - (optional) password for authenticated agent registration
-secure_port <secure_port> - (optional) port for agent traffic. Default: 1514/UDP
-prompt_agent_name [0|1] -  (optional) interactive mode to prompt for the agent name. Cannot be used in a GPO
-use_fqdns [0|1] - (optional) Use the Fully Qualified DNS Name (FQDN) for the agent name
-update_agent - (optional) Update agent to specified version. Default: ossec-agent-latest
-reinstall [0|1] - (optional) reinstall the agent. Note this will replace the existing key and config
-rekey [0|1] - (optional) forces an existing installation to request a new key
-default_name - (optional) use <external IP>-<hostname> naming key for the agent.
-help - display help
Step 1: Open Powershell as an Administrator and run the following command to download the agent installer
Note: Windows defaults the download of the installer to system32. We recommend changing the download location to a directory which the user has permissions such as c:\users
Invoke-WebRequest http://<hub_ip>/installers/agent_deployV2.ps1 -Outfile .\agent_deployV2.ps1
Step 2: For first time agent installs or for scaling agent installs via GPO or other third party tools in a windows environment. Open a CMD shell as an Administrator in the directory where agent_deployV2.ps1 was downloaded and run the following where <hub_ip> is the IP address of the AO hub, or Cluster load balancer
powershell -executionpolicy bypass -file .\agent_deployV2.ps1 -ossec_exe http://<hub ip>/channels/awp-hub-repo/windows/ossec-agent-latest.exe -server_ip <hub ip>
Example 1: Installation via network share at E:sharing
powershell -executionpolicy bypass -file .\agent_deployV2.ps1 -ossec_exe E:\sharing\ossec-agent-latest.exe -server_ip 192.168.1.10
Example 2: Install from AO Hub, and set an alternate agent name to myexample
powershell -executionpolicy bypass -file .\agent_deployV2.ps1 -ossec_exe http://192.168.1.10/channels/awp-hub-repo/windows/ossec-agent-latest.exe -server_ip 192.168.1.10 -agent_name myexample
Windows: Automated Installation using Active Directory (GPO)
Bulk installation can be automated in a windows environment through an active directory Group Policy Object configured from the active directory server. These can be added to startup/shutdown scripts or the scheduled task manager. Workflow for this mechanism follows:
Installs and configures the agent on a host reboot
Runs 1 time
copies agent_deployV2.ps1 from a share drive to the system
Agent runs agent_deployV2.ps1 locally as SYSTEM
Downloads software to C:ossec-agent-latest.exe
Installs application
Registers the agent with the hub server
Configures and starts the agent on the host
Step 1: Copy the atomicorp agent_deployV2.ps1 to a share drive available to all hosts in the domain. Ex: \WIN-GR3UV2QCST8.atomicorp.comsharingagent_deployV2.ps1
Step 2: From server manager Dashboard select: Tools-> Group Policy management
Step 3: Select your domain. Ex: atomicorp.com
Step 4: Right click on your domain, create GPO in this domain and link it here. Ex: install1
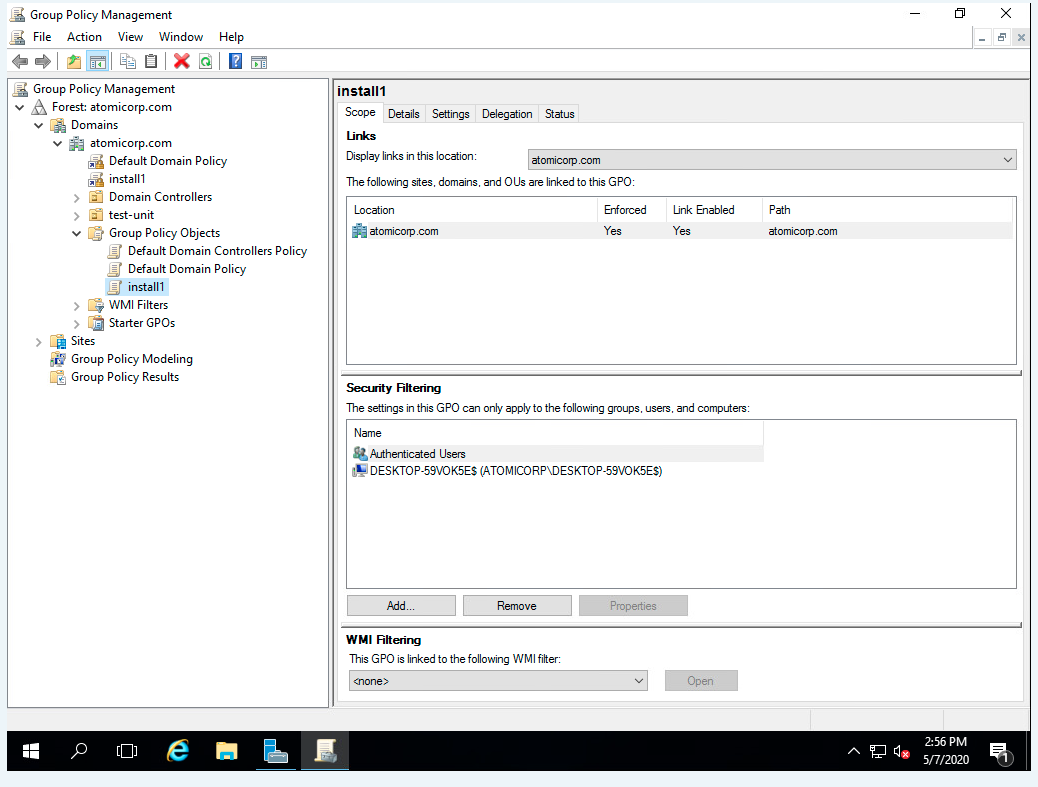
Step 5: Right click on install1, select edit
Step 6: 6. Select Computer Configuration->Preferences->Windows Settings->Files
Step 7: Right click and select New->File
Step 8: Set Action to Create
Step 9: Select path to source file, ExSelect path to destination on host, Ex: C:agent_deployV2.ps1
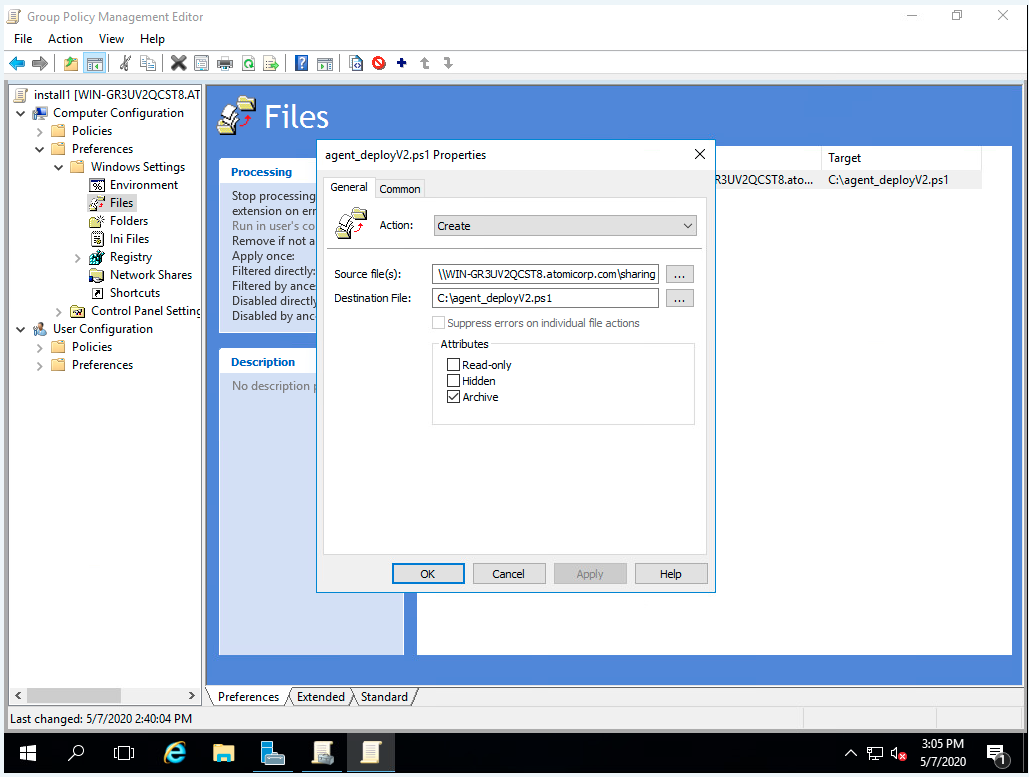
Step 10: Click OK
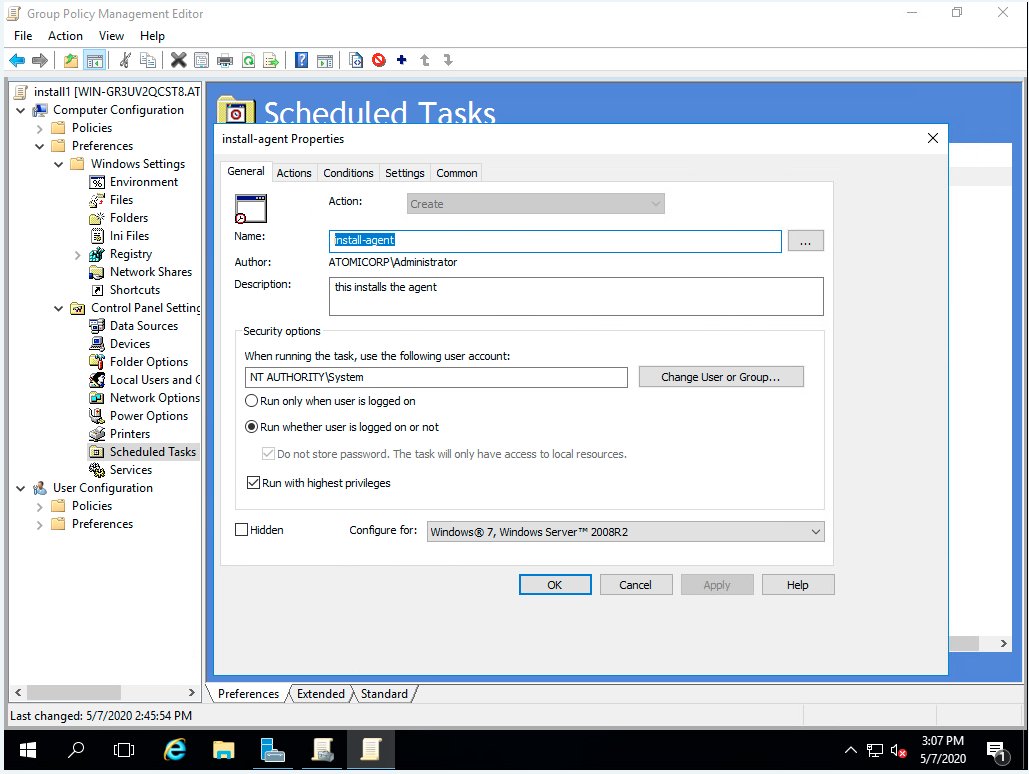
Step 11: Select Computer Configuration->Preferences->Control Panel Settings->Scheduled Tasks
Step 12: Right click and select New->Immediate Scheduled Task (At least windows 7)
Step 13: Enter name, Ex: install-agent
Step 14: Enter description, Ex: install Atomicorp agent
Step 15: Select When running the task, use the following user account, enter: SYSTEM
Step 16: Select Run whether user is logged on or not
Step 17: Select Run with highest privileges
Step 18: Select configure for Windows 7, Windows Server 2008R2
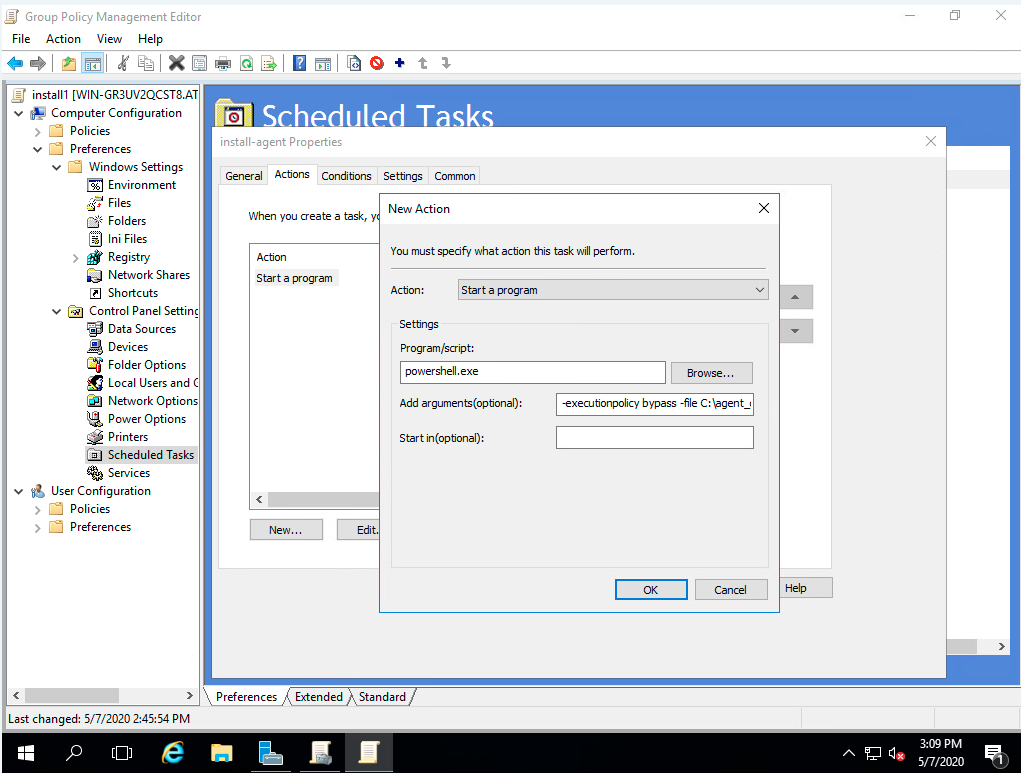
Step 19: Select the Actions tab, and click New
Step 20: Enter in Program/Script: powershell.exe
Step 21: Enter in Add arguments (optional), replacing <IP> with the IP address of the AO Hub, or cluster load balancer. Ex:
-executionpolicy bypass -file C:\agent_deployV2.ps1 -ossec_exe http://192.168.1.101/channels/awp-hub-repo/windows/ossec-agent-latest.exe -server_ip 192.168.1.101
Step 22: Click OK
Step 23: Select the Common tab, and check Apply once and do not reapply
Step 24: Click OK
Step 25: Reboot hosts in this domain to run this GPO
AIX
OSSEC Installer (Recommended)
Note
Requires yum installation, yum support for AIX is available at https://public.dhe.ibm.com/aix/freeSoftware/aixtoolbox/ezinstall/ppc/yum.sh
Command Line Parameters
ossec-installer.sh –server <IP.ADDRESS.HUB>
example:
./ossec-installer.sh --server 10.11.12.13Command line parameters:
--server <server_ip>                    IP/Hostname of the server hub

--auth <auth_ip>                        IP/Hostname of the registration service. Used in complex clustering configurations where the registration IP differs from the Hub IP/Server

--password <password>                   Registration authentication password. D

--port <port>                           Port to communicate with the Hub server

--protocol <tcp|udp>                    Protocol for remoted

--agent-name <name>                     Set agent name [Default: hostname]

--enable-unattended-upgrades            Enable unattended upgrade support (Debian/Ubuntu only)

--default-name                          Prepend the external IP of the agent to agent name

--group  <groupname>                    Group to assign agent. [Default: default]

--https                                 Use https for installation. By default agents will add an apt/yum/dnf repo on HTTP. HTTPS installations require a valid SSL certificate on the hub server.

--install-only                          Only install the agent, do not register

--proxy <disable|url>                   Proxy settings. Proxy URL, or disable proxy for this installation
--use-aws                               Use the AWS instance ID for the agent name

--version                               Show Version
Deprecated installation:
The following method is deprecated, and will be removed in a future update.
ossec-installer.sh <IP.ADDRESS.HUB> <IP.ADDRESS.AUTHD.SERVER> <PROTOCOL> <PORT>
example:
./ossec-installer.sh 10.11.12.13
<IP.ADDRESS.HUB> - (Required) IP address of the AO Hub Worker/Master, or Cluster Load balancer
<IP.ADDRESS.AUTHD.SERVER> - (Optional) IP address of the AO Hub Master, or Cluster Load balancer for agent registration
<PROTOCOL> - (Optional) tcp or udp
<PORT> - (Optional) port
optional environment variables
example:
export SERVER_IP=10.11.12.13 ./ossec-installer.sh
AUTH_IP - IP of server registration service.
GROUP - Group to assign agent
PASSWORD - Registration authentication password
PROTOCOL - Protocol tcp or udp
PORT - Port for remoted
SERVER_IP - IP of server hub
Step 1: Log into the system, and download the installer from the AO Hub
wget https://<IP.ADDRESS.HUB>/installers/ossec-installer.sh
Step 2: Change permissions of the installer
chmod +x ossec-installer.sh
Step 3: Execute the script with the IP address of the AO Hub server
sudo ./ossec-installer.sh --server <IP.ADDRESS.HUB>
Yum installation (Not Recommended)
Note
yum support for AIX available at https://public.dhe.ibm.com/aix/freeSoftware/aixtoolbox/ezinstall/ppc/yum.sh
Add yum repo to /etc/yum.repos.d/atomicorp.repo
[atomicorp-ossec]
name=attomicorp ossec
baseurl=https://<hub_ip>/channels/awp-hub-repo/aix/7/ppc
Install agent:
yum install ossec-hids-agentConfigure ossec.conf:
vim /var/ossec/etc/ossec.conf
Set <server-ip> to the hub ip
Register agent:
/var/ossec/bin/agent-auth -m <hub_ip>Start Agent
/var/ossec/bin/ossec-control start
RPM Manual Installation (Not recommended)
Download AIX rpm package from the AO Hub
wget https://<hub_ip>/channels/awp-hub-repo/aix/7/ppc/ossec-hids-4.4.4-3.art.aix7.2.ppc.rpm
wget https://<hub_ip>/channels/awp-hub-repo/aix/7/ppc/ossec-hids-agent-4.4.4-3.art.aix7.2.ppc.rpm
rpm -Uvh ossec-hids*rpm
Set <hub_ip> in /var/ossec/etc/ossec.conf
Provision agent key with:
/var/ossec/bin/agent-auth -m <hub_ip>
Start agent:
/var/ossec/bin/ossec-control restart
OSX
Requirements
root or sudo access
bash
wget
Command Line Parameters
osx-agent-installer.sh
–server_ip <IP> - IP address of the AO Hub, or Cluster Load balancer
—agent_name <name> - (Optional) specify a name for the agent. Default: System hostname
–port <port> - (Optional)
—udp / –tcp - (Optional) protocol to the manager; default is UDP
Step 1: Download the installer
wget http://<hub_ip>/installers/osx-agent-installer.sh
Step 2: Set execute permissions
chmod +x osx-agent-installer.sh
Step 3: Run the installer with root privileges
sudo ./osx-agent-installer.sh --server_ip <hub_ip>Optional: set a custom agent name (default is the system hostname):
sudo ./osx-agent-installer.sh --server_ip <hub_ip> --agent_name "<name_of_agent>"
Solaris
Supported Platforms
Solaris 10 (x86, sparc)
Solaris 11 (x86, sparc)
Features
ClamAV Management
Support for updating Solaris AV signatures from the Atomic OSSEC hub (/var/ossec/modules/clamav/freshclam)
Supports CSWclamav 0.100
Integration with the Atomic OSSEC scheduler
Requirements
Root or sudo access
Bash
Wget
(Optional) ClamAV support requires the clamav package from the OpenCSW repository
Note
The Solaris OSSEC agent and OpenCSW mirror repositories are not enabled by default on the hub server. Please follow these steps enable, and update:
Edit the awp-mirror.conf configuration file:
vi /var/awp/etc/awp-mirror.confSet SOLARIS=1 as shown:
DISABLED=no
AIX=0
AMZN=1
DEBIAN=1
EL5=0
EL6=0
EL7=1
EL8=1
EL9=1
SUSE=0
OSX=0
SOLARIS=1
UBUNTU=1
WINDOWS=1
DEBUG=0
BETA=0
Save the file and run the following command:
/etc/cron.daily/awp-mirror-update
Installation Steps
Step 1: Download the OSSEC installer from the AEO Hub
/usr/sfw/bin/wget http://<IP.ADDRESS.HUB>/installers/ossec-installer.sh
Step 2: Change permissions of the installer
chmod +x ossec-installer.sh
Step 3: Install the agent software
./ossec-installer.sh --server <IP.ADDRESS.HUB>Note
See the Linux section above for additional command line parameters.
Note
During installation, either the public OpenCSW repository (recommended) or if access to the public OpenCSW repository is not available, a minimal OpenCSW mirror from the AEO hub server is available. The OpenCSW repository is required to install Atomic OSSEC. Passing –opencsw-repo local will configure the installer to automatically use the Atomic Hub server subset mirror of OpenCSW, –opencsw-repo official will automatically configure the installer to use the official OpenCSW mirror
Step 4 (Optional): Update syslog.conf to log ClamAV events
By default, Solaris has minimal logging and will not log ClamAV or other service events (e.g., SSH). Enabling the following configuration is recommended:
vi /etc/syslog.conf
# Add `local0.info` to record ClamAV events
*.err;kern.debug;daemon.notice;mail.crit;*.info /var/adm/messages
svcadm restart svc:/system/system-log:default
Release Notes
CSWclamav freshclam replacement: - The native freshclam utility is no longer functional and cannot be repaired. - /var/ossec/modules/clamav/freshclam replaces it, downloading updates from the Atomic OSSEC hub server over HTTPS using curl or wget. - curl is now a dependency for awp-agent. Updates can be executed via cron or automatically triggered on agent restart or server update signals.
Signature Updates: - Solaris supports the Linux/Unix class of signatures only. These cover multi-OS malware and Unix/Linux-specific threats. Windows, macOS, and Android signatures are excluded.
Memory Usage: - The memory footprint for ClamAV on Solaris is reduced from 1.28GB to 81MB.
Scheduled Scans: - All scheduled scans via the Atomic OSSEC API use clamdscan. The CSWclamd service is required to support these scans.
Signature Directory: - CSWclamav stores signatures in /var/opt/csw/clamav/db. Additional signatures from third parties can be added to this directory.
Starting/Stopping the Agent:
The Atomic OSSEC agent can be managed using either:
/etc/init.d/ossec-agent start|stop/var/ossec/bin/ossec-control start|stop
Syslog Configuration: - By default, the Solaris syslog.conf does not log ClamAV virus detection events. See the steps above to enable logging. - If remote syslog is in use and bypasses /var/adm/messages, ClamAV detection events will not be logged.
Ansible: Linux
Atomic OSSEC includes playbooks to facilitate remote installations of a target system from the hub server using Ansible.
Requirements
SSH access to the target system
Root or Sudo permissions on both the Hub and target system
ansible
Variables Parameters
Additional environmental variables can be passed to the installer to handle alternate configurations
SERVER_IP (Required) Declares the IP of the Hub server/Load balancer
AUTH_IP (Required) IP of the registration server (default: SERVER_IP)
PROTOCOL (Required) tcp or udp (default: tcp)
PORT (Required) Port for agent communication (default: 1514)
GROUP (Required) Group to assign the agent (default: default)
Note
AUTH_IP is used for cluster configurations, for a single host this is the same IP as the SERVER_IP
Step 1: Log into the system, and change to the ansible directory
cd /etc/ansible/atomicorp
Step 2: Update/Create hosts.yml inventory
vim hosts.yamlNote
/etc/ansible/atomicorp/hosts.yml.template is provided as a reference for creating an ansible inventory
Step 3: Run the playbook with the SERVER_IP, AUTH_IP, GROUP, PORT and PROTOCOL values
ansible-playbook linux-agent-installer.yml -i hosts.yml --extra-vars="SERVER_IP=192.168.100.254 PROTOCOL=tcp PORT=9091 AUTH_IP=192.168.100.254 GROUP=default"