Linux Local Rule Installation
Automated Installation: Apache
Step 1) Install aum by running the following command:
wget -q -O - https://updates.atomicorp.com/installers/aum | sudo bash
Step 2) Configure aum by running the following:
sudo aum configure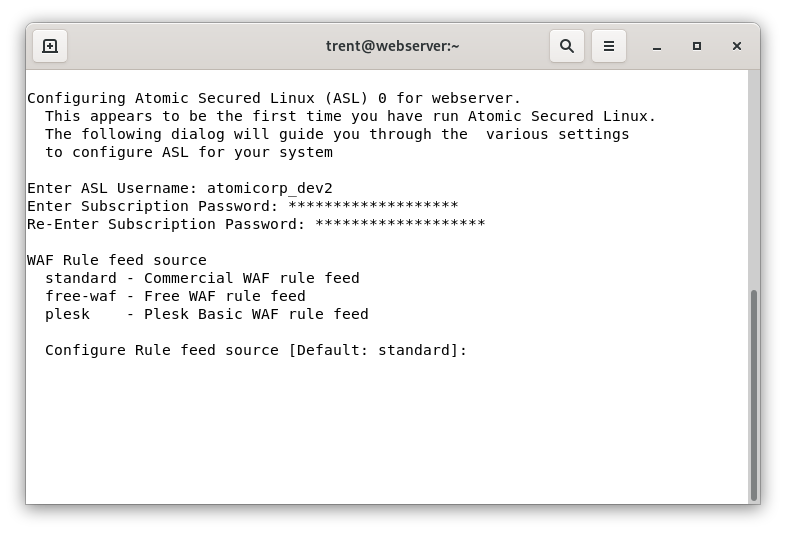
Note
Enter the username/password configured during registration, and the feed source is the type of product. Commercial feed users should select “standard” here.
Step 3) Tell aum to install the rules by running the following command as root:
sudo aum -u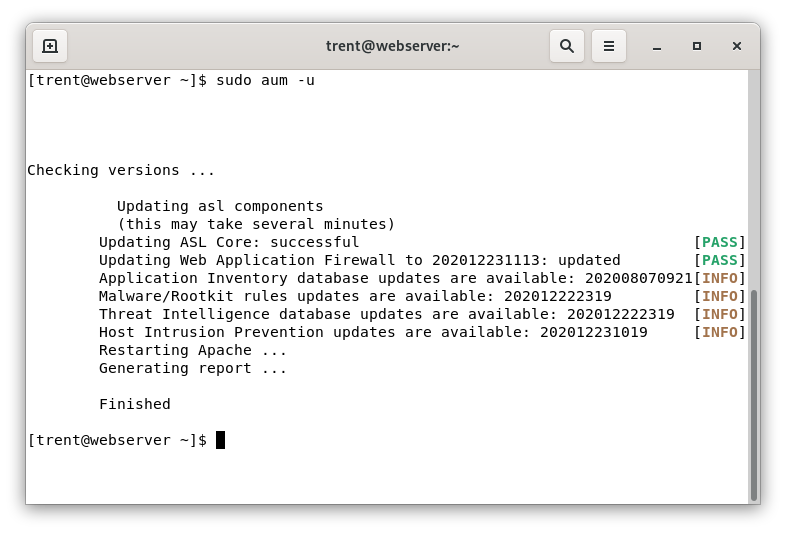
Note
This capability is included with Atomic Protector by default
Manual Installation: Apache
Note
A manual installation is not necessary if you have Atomic Protector or AUM installed. These utilities will configure and install modsecurity, rules, and automatically update the ruleset.
Linux:
Step 1: Download ModSecurity
Binary RPM/Debs: http://updates.atomicorp.com/channels/atomic/
Step 2: Setup and Configure Directories (Non-standard Apache only)
If you are using a standard Apache installation from the vendor repo you can skip this step. Run the following commands as root:
mkdir /etc/httpd/modsecurity.d
mkdir /var/asl
mkdir /var/asl/tmp
mkdir /var/asl/data
mkdir /var/asl/data/msa
mkdir /var/asl/data/audit
mkdir /var/asl/data/suspicious
Step 3: Set Permissions for Directories (Non-stanard Apache only)
Set the following permissions on the directories you just created. In this example these directories are set to be owned by “apache” and the group “apache”, which is standard on a normal Centos or RHEL system. However some control panels configure apache to run as a different user, such as nobody, or http.
To determine what directories use this, run the following command:
ps auxwww | grep httpdThe output would look similar to the following:
root     26755  0.0  4.3 430752 86432 ?        Ss   04:30   0:01 /usr/sbin/httpd
apache   26908  0.0  3.7 300564 75076 ?        S    04:30   0:00 /usr/sbin/httpd
apache   26909  0.1  5.5 495812 112084 ?       S    04:30   0:37 /usr/sbin/httpd
apache   26910  0.0  5.3 495424 106672 ?       S    04:30   0:23 /usr/sbin/httpd
apache   26911  0.1  5.7 495892 114368 ?       S    04:30   0:57 /usr/sbin/httpd
apache   26912  0.1  5.7 496056 114440 ?       S    04:30   0:52 /usr/sbin/httpd
apache   26913  0.1  5.5 496604 110692 ?       S    04:30   0:57 /usr/sbin/httpd
apache   26914  0.0  5.7 499324 116236 ?       S    04:30   0:16 /usr/sbin/httpd
apache   26915  0.2  5.5 493600 112192 ?       S    04:30   1:09 /usr/sbin/httpd
apache   26916  0.1  6.4 513760 129992 ?       S    04:30   0:30 /usr/sbin/httpd
In this example the user in bold is “apache” (this may be different for your system). This is the user you will want to set the directory permissions to (as in the example below):
chown apache.apache /var/asl/data/msa
chown apache.apache /var/asl/data/audit
chown apache.apache /var/asl/data/suspicious
chmod o-rx -R /var/asl/data/*
chmod ug+rwx -R /var/asl/data/*
Step 4 (Optional): Create Rule Updater Directories
These directories must as be created if you use optional rules updater. Create these directories as root and they only need to be accessed by root:
mkdir /var/asl/updates
mkdir /var/asl/rules/
mkdir /var/asl/rules/clamav
Step 5: Create the Whitelist File
Create the whitelist file by running the following command as root:
touch /etc/asl/whitelistThis file contains a list of IPs you want to exclude from ALL rules. That means those IPs can do anything to your system - so be very very careful about what IPs you add to this list. This is a dangerous thing to do. The format of the file is a single IP, per line.
Note
Cpanel users should skip to the notes at the bottom of this page for special additional actions for cpanel systems. All other users should continue with these instructions.
Step 6: Configure your WebServer
Configure Apache to load ModSecurity. Depending on your apache configuration, apache should be configured to include configuration files. If you have a setting like this in your apache config:
Include conf.d/*.confThen you are setup to load external configuration files. If you do not have this setup, its highly recommend you add this. This installation guide is written for this type of configuration. Loading mod_security occurs by including a modsecurity configuration file in that directory. We recommend you name the name 00_modsecurity.conf to ensure it runs first. Its vitally important that modsecurity load before other modules, otherwise attacks can occur before modsecurity scans them and some attacks can be missed.
An example 00_modsecurity.conf file:
<IfModule>
   LoadModule security2_module modules/mod_security2.so
   LoadModule unique_id_module modules/mod_unique_id.so
   <IfModule mod_security2.c>
   Include modsecurity.d/tortix_waf.conf
</IfModule>
Install this file in your conf.d directory. On a standard RHEL or Centos system that directory is located here:
/etc/httpd/conf.d/Step 7: Configure ModSecurity
You then need to configure modsecurity. This is done via the an apache configuration file. In this example, we will create the file “tortix_waf.conf”. Here is an example file that works with our rules:
SecRuleEngine On
SecRequestBodyAccess On
SecResponseBodyAccess On
SecResponseBodyMimeType (null) text/html text/plain text/xml
SecResponseBodyLimit 2621440
SecServerSignature Apache
SecComponentSignature 200911012341
SecUploadDir /var/asl/data/suspicious
SecUploadKeepFiles Off
SecAuditEngine RelevantOnly
SecAuditLogRelevantStatus "^(?:5|4(?!04))"
SecAuditLogType Concurrent
SecAuditLog logs/audit_log
SecAuditLogParts ABIFHZ
SecArgumentSeparator "&"
SecCookieFormat 0
SecRequestBodyInMemoryLimit 131072
SecDataDir /var/asl/data/msa
SecTmpDir /tmp
SecAuditLogStorageDir /var/asl/data/audit
SecResponseBodyLimitAction ProcessPartial
SecAuditLogDirMode 0770
SecPcreMatchLimit 250000
SecPcreMatchLimitRecursion 250000
You will want to install this file in your modsecurity.d directory, which is located here if you followed the instructions above:
/etc/httpd/modsecurity.d/Step 8: Download the ModSecurity Rules
https://updates.atomicorp.com/channels/rules/subscription/
Step 9: Remove any previous ModSecurity Rules
Remove any previous installations of rules.
If you have installed our delayed rules, you will need to make sure you have deleted them. You will not want to have any older versions of the rules installed.
Also, if you have installed any third party modsecurity rules, you will want to make sure they are using rule id’s that are assigned to them. The modsecurity project assigns ranges to the rule id’s modsecurity uses. Modsecurity requires a unique id for each rule, otherwise you will get an error like this:
ModSecurity: Found another rule with the same idThis means either that someone else is using the same rule id’s assigned to our ruleset by the modsecurity project (our official range is 300000-399999), or you have loaded our rules twice.
Step 10: Install ModSecurity Rules
Download the rules to a temporary directory using your favorite download too. Extract the rules:
tar zxvf /var/awp/updates/modsec-200911012341.tar.gzThen copy each of the Atomic Protector rule files you wish to use into /etc/httpd/modsecurity.d. Do not copy all of the rule files, you will need to select rule files that are appropriate for your system. Or simply use aum or Atomic Protector to do this for you automatically.
If you are using cpanel, please see the notes at the bottom of this page, cpanel does not use the standard locations for apache configuration files.
Finally, load the rules. Make sure you specify only those rule files that are appropriate for your system. For example:
Include /full/path/to/your/rules/modsecurity.d/10_asl_rules.conf
Include /full/path/to/your/rules/modsecurity.d/99_asl_jitp.conf
Note
You should not include all rules. There are rulesets that replace others or are incompatible with each other.
Minimum Rulesets for Apache:
Include /full/path/to/your/rules/modsecurity.d/00_asl_0_global.conf
Include /full/path/to/your/rules/modsecurity.d/10_asl_antimalware.conf
Include /full/path/to/your/rules/modsecurity.d/10_asl_rules.conf
Include /full/path/to/your/rules/modsecurity.d/11_asl_adv_rules.conf
Include /full/path/to/your/rules/modsecurity.d/20_asl_useragents.conf
Include /full/path/to/your/rules/modsecurity.d/30_asl_antispam.conf
Include /full/path/to/your/rules/modsecurity.d/50_asl_rootkits.conf
Include /full/path/to/your/rules/modsecurity.d/60_asl_recons.conf
Include /full/path/to/your/rules/modsecurity.d/61_asl_recons_dlp.conf
Include /full/path/to/your/rules/modsecurity.d/99_asl_jitp.conf
If you are using ModSecurity 2.9.0, you can use this additional ruleset:
Include /full/path/to/your/rules/modsecurity.d/000_asl_threat_intelligence.conf
Include /full/path/to/your/rules/modsecurity.d/00_asl_zz_strict.conf
Include /full/path/to/your/rules/modsecurity.d/00_asl_0_global.conf
Include /full/path/to/your/rules/modsecurity.d/00_asl_z_antievasion.conf
Include /full/path/to/your/rules/modsecurity.d/01_asl_content.conf
Include /full/path/to/your/rules/modsecurity.d/03_asl_dos.conf
Include /full/path/to/your/rules/modsecurity.d/09_asl_rules.conf
Include /full/path/to/your/rules/modsecurity.d/10_asl_antimalware.conf
Include /full/path/to/your/rules/modsecurity.d/10_asl_rules.conf
Include /full/path/to/your/rules/modsecurity.d/11_asl_adv_rules.conf
Include /full/path/to/your/rules/modsecurity.d/11_asl_data_loss.conf
Include /full/path/to/your/rules/modsecurity.d/12_asl_adv_xss_rules.conf
Include /full/path/to/your/rules/modsecurity.d/20_asl_useragents.conf
Include /full/path/to/your/rules/modsecurity.d/30_asl_antispam.conf
Include /full/path/to/your/rules/modsecurity.d/50_asl_rootkits.conf
Include /full/path/to/your/rules/modsecurity.d/51_asl_rootkits.conf
Include /full/path/to/your/rules/modsecurity.d/60_asl_recons.conf
Include /full/path/to/your/rules/modsecurity.d/61_asl_recons_dlp.conf
Include /full/path/to/your/rules/modsecurity.d/99_asl_jitp.conf
Include /full/path/to/your/rules/modsecurity.d/98_asl_adv_redactor.conf
If you have a Local DNS resolver setup and configured properly, and are using ModSecurity 2.9.0 we also recommend the following rulesets:
Include /full/path/to/your/rules/modsecurity.d/00_asl_z_searchengines.conf
Include /full/path/to/your/rules/modsecurity.d/00_asl_z_aa_threat_intelligence.conf
Include /full/path/to/your/rules/modsecurity.d/99_asl_zzzz_threat_intelligence.conf
Step 11: Test your WebServer (Optional)
For non Atomic Protector Systems:
Step 1) Make sure you have the rules installed exactly as described on this page. This test may not work if you have not followed these instructions. (If you used Atomic Protector to setup your WAF, and you have not installed any third party tools that configure, install or manage modsecurity then your rules are installed correctly and you do not need to review the instructions on this page. If you have manually altered your modsecurity configuration then you will need to review this entire article. Manual modifications of Atomic Protector modsecurity configurations are not supported.)
Step 2) Make sure all rules are enabled
Step 3) Test from a non-whitelisted system
Step 4) Run the following test from the system:
wget http://localhost/foo.php?foo=http://www.example.comIf the test worked, you will see output similar to the following:
--2010-05-27 20:12:25--  http://localhost/foo.php?foo=http://www.example.com
Resolving localhost... 127.0.0.1
Connecting to localhost|127.0.0.1|:80... connected.
HTTP request sent, awaiting response... 403 Forbidden
2010-05-27 20:12:25 ERROR 403: Forbidden.
If you did not get a 403 error, then the test did not work.
What to do if you do not get a 403 error:
You may have rules disabled, make sure your rules are enabled.
Your IP is whitelisted. There is a rule whitelisting the system you are conducting this test from. Whitelisting tells the WAF to ignore everything from that source.
For example, cpanels default modsecurity configuration will configure modsecurity to ignore everything from 127.0.0.1, or from the system itself. So if you perform the test above from the server itself, and you have not removed this cpanel whitelist, then you will not get a 403 error. More than likely you will get a 404 error. The solution is to remove any whitelists from your system.
Note
Whitelisting the server itself can open a hole in your security. You should not whitelist localhost or the servers own IP address, particularly if you have multi users on the system. This is both unnecessary, and doing so will allow any users on the system to carry out attacks on other domains on the system unimpeded. Make sure you do not have any rules like that, this opens a very large hole in your system.
Local error message is different. You or someone else may have configured your system to use a different error message. Check your configuration, and make sure it exactly matches the ones on this wiki. IF you are using kind of plugin that does not return a 403 when a connection is rejected, and you must use this, then you will need to manually check your mod_security logs to see if your test is being rejected by modsecurity. If it is, then your rules are working correctly and you can ignore the error code.
Third-Party addons. You have third party rules or addons installed with your modsecurity configuration that are changing the responses. Remove all third party addons, and make sure your configuration exactly matches the instructions on this page
Insecurely Configured Apache. Some control panels are known to disable modsecurity on localhost, and on the systems IP addresses. These highly insecure control panels essentially disable modsecurity if an attacker connects to the systems IP address. This of course leaves your system wide open to attack, and if you are unlucky enough to be using one of these control panels we recommend you report this to your control panel vendor as a serious vulnerability. If they are unwilling to fix it, then we recommend you find a more security conscious control panel vendor.
Example: We have seen some control panels that configure modsecurity to be disabled in the /etc/httpd/conf/httpd.conf file for all the local IPs on the system.
<VirtualHost <LOCAL IP ADDRESS>:80 127.0.0.1:80 *>
  <IfModule mod_security2.c>
    SecRuleEngine Off
  </IfModule>
If your control panel has this vulnerability, you can remove this, but its very possible the control panel will simply open this hole in your system again. We highly recommend you report this vulnerability to your control panel vendor, and if they are unwilling to fix this vulnerability that you find a more security conscious control panel vendor.
You aren’t loading the rules. This is common with custom configurations. Check to make sure your webserver is configured to load the rules. Keep mind that modsecurity will still generate generic messages even though the rules are not loaded. For example, if all you see are events like this:
--70c19f31-A--
[01/Jan/2013:11:19:13 --0300] roiKIi6Ni3EKFZSKpSUs2iEb 1.2.3.4 34978 5.6.7.8 80

--70c19f31-B--
HEAD / HTTP/1.1
User-Agent: Mozilla/5.0 (Windows NT 6.1; WOW64)

Accept: */*

--70c19f31-F--
HTTP/1.1 403 Forbidden
X-Powered-By: PHP/5.4.20
Expires: Thu, 19 Jan 2001 02:12:00 GMT
Cache-Control: no-store, no-cache, must-revalidate, post-check=0, pre-check=0
Pragma: no-cache
Connection: close
Content-Type: text/html

--70c19f31-H--
Stopwatch: 1383338363503919 358184 (- - -)
Stopwatch2: 1383338363503919 358184; combined=2144, p1=37, p2=2053, p3=0, p4=0, p5=53, sr=0, sw=1, l=0, gc=0
Producer: ModSecurity for Apache/2.7.5 ( http://www.modsecurity.org/).
Server: Apache
Engine-Mode: "ENABLED"

--70c19f31-Z--
In this example, no rule is being triggered, but modsecurity is logging a basic 403 error. It will do this if the modsecurity configuration is loaded, but not the rules. So if you see this happening on your system, and you have ruled out all other issues in this list, it means your custom configuration isn’t loading the rules.
Atomic Protector will automatically configure modsecurity correctly. So if you are having problems configuring modsecurity yourself, then we recommend you use Atomic Protector to setup modsecurity for you.
Manual Installation: Nginx
Requirements:
libmodsecurity 3.0.3+
Valid rules subscription
Step 1) Add nginx-module-modsecurity package to nginx
wget -q -O - https://updates.atomicorp.com/installers/atomic |bash

yum install mod_security
Note
epel-release repo is required for mod_security installation. Please follow your operating system instructions for adding epel
Step 2) Enable modsecurity in /etc/nginx/nginx.conf
load_module modules/ngx_http_modsecurity_module.so;
Step 3) Download/Extract ruleset from: https://updates.atomicorp.com/channels/rules/nginx-latest/
tar xvf nginx-waf-202012282321.tar.bz2
Step 4) Remove old rules and copy contents to the rule config directory
#New install
mkdir -p /etc/httpd/modsecurity.d/

#Updating
rm -f /etc/httpd/modsecurity.d/*asl*

cp rules/* /etc/httpd/modsecurity.d/

cp rules/conf/tortix_waf.conf /etc/httpd/modsecurity.d/
Step 5) Configure rule classes to activate in /etc/nginx/conf.d/00_modsecurity.conf
modsecurity on;
modsecurity_rules_file /etc/httpd/modsecurity.d/tortix_waf.conf;
modsecurity_rules_file /etc/httpd/modsecurity.d/00_asl_whitelist.conf;
modsecurity_rules_file /etc/httpd/modsecurity.d/00_asl_x_searchengines.conf;
modsecurity_rules_file /etc/httpd/modsecurity.d/00_asl_y_searchengines.conf;
modsecurity_rules_file /etc/httpd/modsecurity.d/00_asl_z_antievasion.conf;
modsecurity_rules_file /etc/httpd/modsecurity.d/00_asl_zz_strict.conf;
modsecurity_rules_file /etc/httpd/modsecurity.d/01_asl_content.conf;
modsecurity_rules_file /etc/httpd/modsecurity.d/03_asl_dos.conf;
modsecurity_rules_file /etc/httpd/modsecurity.d/05_asl_exclude.conf;
modsecurity_rules_file /etc/httpd/modsecurity.d/10_asl_rules.conf;
modsecurity_rules_file /etc/httpd/modsecurity.d/11_asl_data_loss.conf;
modsecurity_rules_file /etc/httpd/modsecurity.d/12_asl_brute.conf;
modsecurity_rules_file /etc/httpd/modsecurity.d/20_asl_useragents.conf;
modsecurity_rules_file /etc/httpd/modsecurity.d/30_asl_antispam.conf;
modsecurity_rules_file /etc/httpd/modsecurity.d/31_asl_urispam.conf;
modsecurity_rules_file /etc/httpd/modsecurity.d/50_asl_rootkits.conf;
modsecurity_rules_file /etc/httpd/modsecurity.d/51_asl_rootkits.conf;
modsecurity_rules_file /etc/httpd/modsecurity.d/60_asl_recons.conf;
modsecurity_rules_file /etc/httpd/modsecurity.d/61_asl_recons_dlp.conf;
modsecurity_rules_file /etc/httpd/modsecurity.d/98_asl_jitp.conf;
modsecurity_rules_file /etc/httpd/modsecurity.d/99_asl_jitp.conf;
Note
Not all rule classes are appropriate for every configuration. Consult the WAF rule family documentation for more information
Manual Installation: Cpanel
Note
AUM and Atomic Protector support Cpanel natively. Manual installation is not recommended.
These are additional considerations for installing modsecurity with cpanel. Please read this entire page, as well as this section if you are installing modsecurity with cpanel (even if you already have modsecurity install with cpanel).
We recommend if you are using cPanel that you follow this advice, as cpanel includes a very minimal configuration for modsecurity that does not include all of the required and optimal settings documented here. Our settings will make your server faster, and more importantly more secure. If you use mod_security with Cpanel you must add these additional settings to experience the full feature set of mod_security.
Follow the process below:
Make sure you have read this entire document and have setup all the require directories details above.
Configure directory permissions. Cpanel also does not run apache as a standard user (such as apache) but as the older non-privileged user “nobody”. You will need to ensure then that the work directories that mod_security uses are owned by the user that Cpanel runs apache as. To find this out you can run this command as root:
You should see output similar to the following:
root     20594 86.8  3.1 255148 181232 ?       Ss   11:39   0:04 /usr/local/apache/bin/httpd -k restart
root     20611  0.0  3.1 255060 179596 ?       S    11:39   0:00 /usr/local/apache/bin/httpd -k restart
nobody   20612  0.0  3.1 255148 180224 ?       S    11:39   0:00 /usr/local/apache/bin/httpd -k restart
nobody   20613  0.0  3.1 255148 180224 ?       S    11:39   0:00 /usr/local/apache/bin/httpd -k restart
nobody   20614  0.0  3.1 255148 180224 ?       S    11:39   0:00 /usr/local/apache/bin/httpd -k restart
nobody   20615  0.0  3.1 255148 180224 ?       S    11:39   0:00 /usr/local/apache/bin/httpd -k restart
nobody   20616  0.0  3.1 255148 180224 ?       S    11:39   0:00 /usr/local/apache/bin/httpd -k restart
In this example from a Centos system running Cpanel the user is “nobody”, so you would want to use these commands to configure the modsecurity work directories for a system where apache is running as “nobody”:
mkdir /var/asl
mkdir /var/asl/data/
mkdir /var/asl/data/msa
mkdir /var/asl/data/audit
mkdir /var/asl/data/suspicious
chown nobody.nobody /var/asl/data/msa
chown nobody.nobody /var/asl/data/audit
chown nobody.nobody /var/asl/data/suspicious
chmod o-rx -R /var/asl/data/*
chmod ug+rwx -R /var/asl/data/*
Install ModSecurity
Configure CPanel. Make a small change to the cpanel modsecurity configuration. A typical cpanel modsec2.conf configuration file looks like this:
LoadFile /opt/xml2/lib/libxml2.so
LoadFile /opt/lua/lib/liblua.so
LoadModule security2_module  modules/mod_security2.so
<IfModule mod_security2.c>
SecRuleEngine On
# See http://www.modsecurity.org/documentation/ModSecurity-Migration-Matrix.pdf
#  "Add the rules that will do exactly the same as the directives"
# SecFilterCheckURLEncoding On
# SecFilterForceByteRange 0 255
SecAuditEngine RelevantOnly
SecAuditLog logs/modsec_audit.log
SecDebugLog logs/modsec_debug_log
SecDebugLogLevel 0
SecDefaultAction "phase:2,deny,log,status:403"
Include "/usr/local/apache/conf/modsec2.user.conf"
</IfModule>
Because cpanel will overwrite this configuration, you need to modify your user configuration file. You will want to setup your user configuration file (/usr/local/apache/conf/modsec2.user.conf) as in the example below. This is the recommended configuration and the minimum recommended rule sets that are designed to work with cpanel without Atomic Protector installed. Please be sure to read this entire page for information about additional rules that you may also want to use with cpanel.
SecRequestBodyAccess On
SecAuditLogType Concurrent
SecResponseBodyAccess On
SecResponseBodyMimeType (null) text/html text/plain text/xml
SecResponseBodyLimit 2621440
SecAuditLogRelevantStatus "^(?:5|4(?!04))"
SecServerSignature Apache
SecUploadDir /var/asl/data/suspicious
SecUploadKeepFiles Off
SecAuditLogParts ABIFHZ
SecArgumentSeparator "&"
SecCookieFormat 0
SecRequestBodyInMemoryLimit 131072
SecDataDir /var/asl/data/msa
SecTmpDir /tmp
SecAuditLogStorageDir /var/asl/data/audit
SecResponseBodyLimitAction ProcessPartial

Include /full/path/to/your/rules/modsecurity.d/00_asl_z_antievasion.conf
Include /full/path/to/your/rules/modsecurity.d/00_asl_zz_strict.conf
Include /full/path/to/your/rules/modsecurity.d/09_asl_rules.conf
Include /full/path/to/your/rules/modsecurity.d/10_asl_antimalware.conf
Include /full/path/to/your/rules/modsecurity.d/10_asl_rules.conf
Include /full/path/to/your/rules/modsecurity.d/11_asl_adv_rules.conf
Include /full/path/to/your/rules/modsecurity.d/20_asl_useragents.conf
Include /full/path/to/your/rules/modsecurity.d/30_asl_antispam.conf
Include /full/path/to/your/rules/modsecurity.d/50_asl_rootkits.conf
Include /full/path/to/your/rules/modsecurity.d/60_asl_recons.conf
Include /full/path/to/your/rules/modsecurity.d/61_asl_recons_dlp.conf
Include /full/path/to/your/rules/modsecurity.d/99_asl_jitp.conf
If you want to load just some of the rules, make sure you specify only those rule files. The default list above is the recommended and supported rulesets with cpanel. Do not use the other asl rulesets with cpanel, those other rules either use other apache modules (such as mod_sed) or Atomic Protector specific features that require Atomic Protector.
Make sure you have all of the settings on this page to use modsecurity with cpanel correctly, failing to do that will make it impossible for us to support you and modsecurity will not as quickly or correctly exposing your system to attack and slowing it down.
Install mod_uniqueid: Cpanel users will need to manually verify that the mod_unique_id module is loaded by cpanel’s apache. It should be loaded by default, but check your cpanel configuration to be sure.
Restart Apache by running the following command:
service httpd restart
modsecparse.pl
This is a third party tool not provided by, or supported by Atomicorp. If you use this tool, it apparently does not work with the new fast concurrent logging system in modsecurity. The concurrent logging system is much faster, will speed up apache and is less resource intensive that the older serial method.
However, if you use this tool you must use the slower serial logging method, as it does not support the faster concurrent method. To use this tool, change the SecAuditLogType setting from “Concurrent” to “Serial”:
SecAuditLogType SerialKeep in mind that this logging method is much slower, may slow down apache and is not supported. This performance impact is not caused by the rules. Serial logging is much slower than concurrent logging. Therefore we do not recommend you use this logging method or any tools that require it. There are lots of modsecurity log readers that can use the concurrent logging method, such as Atomic Protector and we encourage you to explore using one of those modern tools instead.
Serial logging is the older slower deprecated logging method modsecurity original used many years ago. This logging method would log the entire event in a single file. As a result, it would slow apache down because each event needed to wait for the previous event to finish writing before it could write to the log file. Events stack up and slow apache down. This incurs a significant performance penalty on apache, and of course a better method was devised for modsecurity to address this performance issue. The solution is the concurrent logging method. This generates a unique event file for each log event, logging the events data to that file instead of trying to jam tons of data into a single file, and thereby slowing down apache. All modern modsecurity log viewing tools support the concurrent method.
The concurrent logging system is much faster, will speed up apache and is less resource intensive that the older serial method. This method is highly recommended over the slow serial logging method.
Configuring Serial Logging using AUM:
If you want to use older, slower serial logging methond, and you are using aum, change this setting in /etc/asl/config
MODSEC_LOGTYPE="Serial"Run the following command to update the Atomic Protector security policy:
aum -uf
Configuring Serial Logging without using AUM:
If you want to use the old slower serial logging method change the SecAuditLogType setting from “Concurrent” to “Serial”:
SecAuditLogType SerialSerial logging is much slower than concurrent logging and will slow down apache. Any performance impact is not caused by the rules.
Therefore we do not recommend you use this logging method or any tools that require it. There are lots of modsecurity log readers that can use the fast concurrent logging method, such as Atomic Protector and we encourage you to explore using one of those modern tools instead of a tool that requires the slower and performance degrading serial logging method.
If you change your system to the slower Serial method, you may also want to change the logfile name you are using for your modsecurity logs. You can do that by changing this option in your configuration:
SecAuditLog logs/audit_log