Clustering

../../../_images/aeo-cluster.png

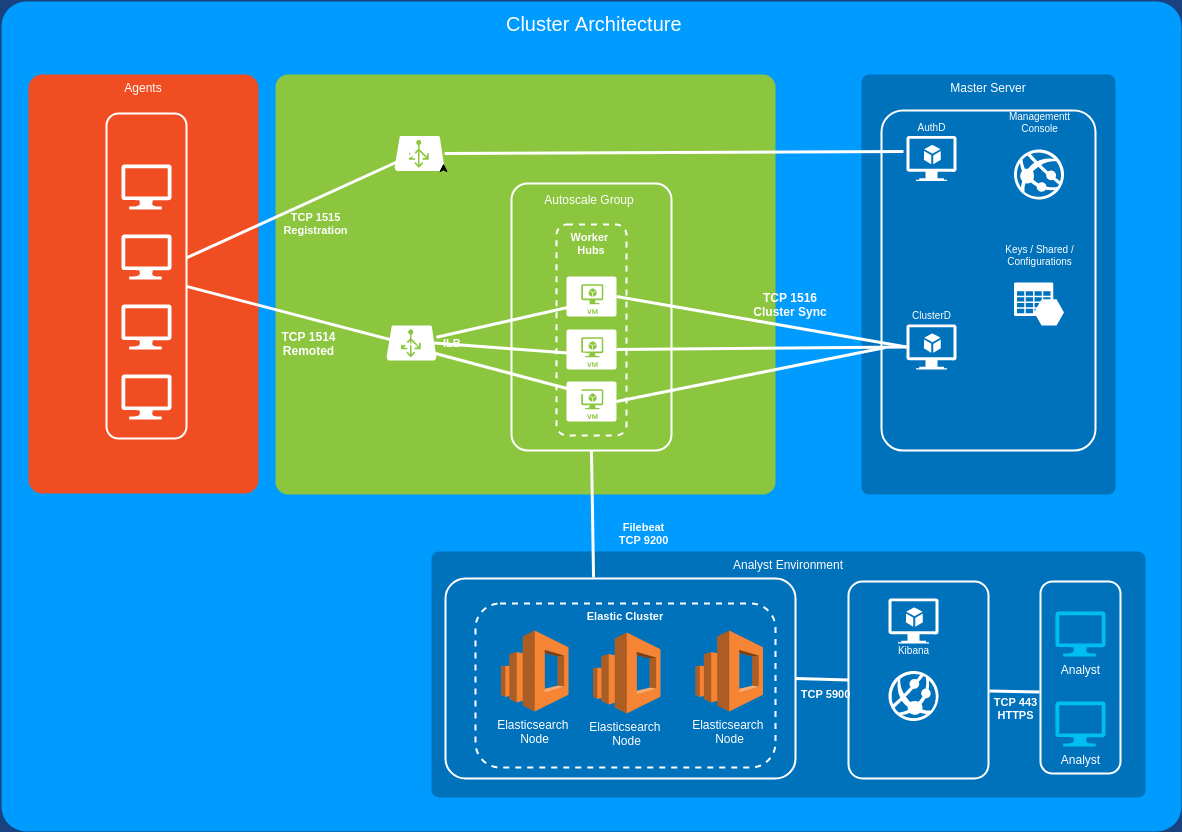
High Performance/High availability clustering is supported in Atomic Enterprise OSSEC, utilizing a read/write primary, and read only secondary design. The read/write primary serves as the central repository for all agent keys, configurations, and settings. Additionally it can be configured to centralize event, compliance, and vulnerability data. Agents will register to the read/write primary, all other connections will be to the read-only Worker nodes.

Configuring a cluster Primary node

Step 1: From the management console, select: AP Configuration->Clustering

../../../_images/aeo-cluster1.png

Step 2: Configure the following settings

Enable Clustering: yes

Cluster Name: The unique name for this cluster, all nodes will use this name.

Example: cluster03

Cluster Node Name: a unique identifier for each cluster node

Example: node01

Cluster Type: Master

Step 3: Generate a 32 character secret key for the cluster. This key will be used on all nodes in this cluster

openssl rand -hex 16

Paste the value returned from this command into the Cluster key: section

Step 4: Set the cluster Master IP address to the IP address of the master server. This value will be used on all nodes in the cluster.

Step 5: Click save to apply these settings to the configuration

Step 6: (Optional) Configure this system to receive events from all nodes in the cluster

  1. Log into the master server, and as root run the command:

/var/awp/bin/cluster-config.sh
  1. Allow traffic to the master server on TCP port 6514 in the firewall settings Inbound TCP Services section:

../../../_images/aeo-cluster1.png
  1. Click save to apply these settings

Configure a cluster Secondary node

Step 1: From the management console, select: AP Configuration->Clustering

../../../_images/aeo-cluster-worker1.png

Step 2: Configure the following settings

Enable Clustering: yes

Cluster Name: The unique name for this cluster, all nodes will use this name.

Example: cluster03

Cluster Node Name: a unique identifier for each cluster node

Example: node02

Cluster Type: Worker

Step 3: Enter the Cluster key value created in Primary configuration step 3 above

Step 4: Set the cluster Master IP address to the IP address of the master server. This value will be used on all nodes in the cluster.

Step 5: Click save to apply these settings to the configuration

Step 6: (Optional) Configure this system to send events to the master node in the cluster

  1. Log into the worker node, and as root run the command:

/var/awp/bin/cluster-config.sh
  1. Copy the connection key (ca.pem) from the master node to the worker node. Example using the scp command from the worker to the master node:

scp root@192.168.122.29:/etc/pki/tls/certs/ca.pem /etc/pki/tls/certs/ca.pem
  1. Restart rsyslogd:

systemctl restart rsyslog